No pods added to your quote request yet. Add some now for a free quote!
These days, conference room pods are everywhere. They give teams a quiet place to meet without distractions. But setting them up right can feel like a puzzle. This guide shows how to plan the layout, handle soundproofing, set up screens and mics, adjust lighting and airflow, and keep your pods in good shape.
Key Takeaways
- Plan the pod placement, size, and traffic paths to fit your space.
- Choose sound-blocking panels and materials to keep noise inside.
- Install clear displays, quality microphones, and strong internet for crisp audio and video.
- Pick lights you can dim or brighten and ensure steady airflow.
- Use simple booking software, control entry with badges or apps, and schedule cleaning and checks.
Planning The Ideal Conference Room Pods Layout
Assess Space Requirements
Okay, so you’re thinking about getting some office privacy pods. First things first, you gotta figure out how much space these things will actually take up. Don’t just eyeball it! Measure the area where you’re planning to put them. Think about the pod’s dimensions, but also factor in some extra space around it. People need to be able to walk around comfortably, and you don’t want anyone feeling cramped. Consider the pod’s footprint, door swing, and accessibility for everyone, including those with disabilities. It’s better to overestimate than underestimate. Trust me, moving furniture around later is a pain.
Define Pod Capacity
Next up, how many people do you want each pod to hold? Are we talking solo work, small team huddles, or something bigger? This will seriously impact the size and layout you choose. A single-person office booth is way different than a pod meant for four or more people. Think about the typical use case. If it’s mostly for phone calls, a smaller pod works. If it’s for brainstorming sessions, you’ll need more room. Also, consider the furniture inside. A big table takes up space, so plan accordingly.
Map Traffic Flow
Now, think about how people move around your office. You don’t want your new soundproof office pods blocking major walkways or creating bottlenecks. Imagine people trying to squeeze past a pod to get to the printer – not fun! Place the pods in areas that are easily accessible but don’t disrupt the natural flow of traffic. Consider things like proximity to exits, restrooms, and common areas. A well-placed pod can actually improve the overall flow of your office, while a poorly placed one can cause chaos.
Think about the noise levels in different parts of your office too. Putting a pod in a super loud area kind of defeats the purpose. Try to find quieter spots where people can actually focus. Also, consider the views. Nobody wants to be stuck in a pod staring at a blank wall all day. A little bit of natural light or a pleasant view can make a big difference.
Selecting Acoustic Solutions For Perfect Soundproofing
Open-plan offices can be noisy. It’s just a fact. Conference pods are supposed to be quiet spaces, so good soundproofing is super important. Let’s look at how to make that happen.
Choosing Sound Absorbing Materials
Okay, so first things first: materials. You can’t just throw up some drywall and call it a day. You need stuff that actually absorbs sound. Think about what you see in recording studios. Here are some common options:
- Acoustic panels: These are fabric-wrapped panels that soak up sound waves. They come in all sorts of colors and sizes, so you can match them to your office decor. Acoustic office pods are a great way to enhance workspace productivity.
- Foam: Wedge-shaped foam is another classic. It’s not always the prettiest, but it works. You can get it in sheets or tiles.
- Heavy curtains or blankets: These can help dampen sound, especially if you have windows in your pod. Just make sure they’re thick.
The key is to choose materials with a high Noise Reduction Coefficient (NRC). This tells you how much sound the material absorbs. The higher the NRC, the better.
Installing Noise-Reducing Panels
Alright, you’ve got your materials. Now it’s time to put them up. Here’s the deal:
- Placement is key: Don’t just slap panels up randomly. Think about where sound is coming from and where it’s bouncing. Walls and ceilings are good places to start.
- Consider coverage: You don’t need to cover every single surface, but the more coverage you have, the better the soundproofing will be. A good rule of thumb is to aim for at least 25% coverage.
- Use proper mounting hardware: Make sure you’re using the right stuff to hang your panels. You don’t want them falling down in the middle of a meeting.
Verifying Acoustic Performance
So, you’ve installed all your soundproofing. How do you know if it’s actually working? Here are a few ways to check:
- The "talk test": Have someone stand inside the pod and talk at a normal volume. Can you hear them clearly from outside? If not, that’s a good sign.
- Sound level meter: You can use a sound level meter to measure the decibel level inside and outside the pod. The difference between the two will tell you how much sound the pod is blocking. Office phone booths create sound-proof private spaces within open workplaces.
- Professional acoustic testing: If you really want to be sure, you can hire an acoustician to come in and do a professional sound test. They’ll use specialized equipment to measure the pod’s acoustic performance and give you recommendations for improvement.
Good soundproofing is a must-have.
Equipping Conference Room Pods With Technology Essentials
Conference room pods are more than just quiet spaces; they’re hubs for productivity and collaboration. To make them truly effective, you need the right tech. Let’s look at what’s important.
Integrating High-Resolution Displays
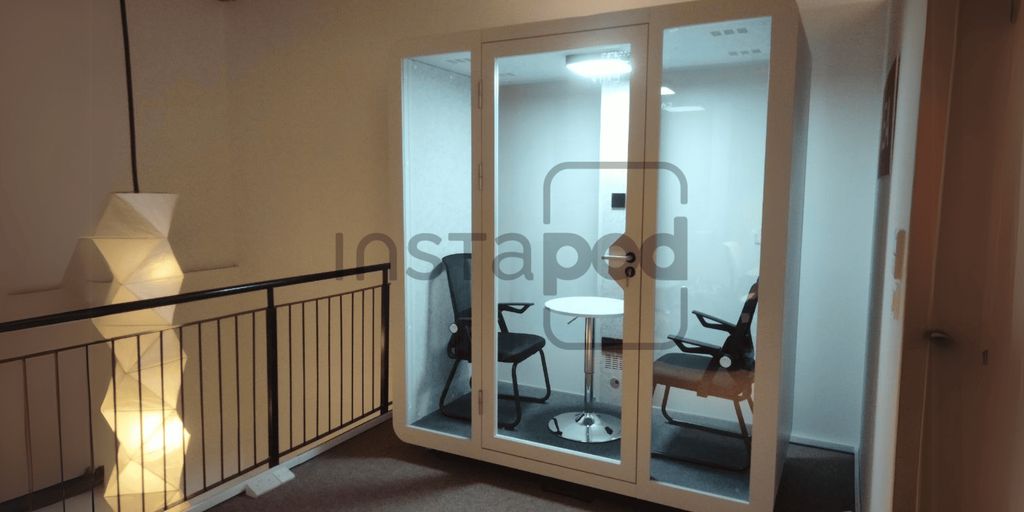
A high-quality display is the centerpiece of any conference pod. It’s what allows for clear presentations, engaging video conferences, and effective collaboration. Consider the size of your pod and the typical number of users when selecting a display. A larger pod will obviously need a bigger screen. Make sure the display has good resolution and brightness so everyone can see clearly, even in well-lit environments.
Setting Up Professional Audio Systems
Audio is just as important as video. A good audio system ensures everyone can hear and be heard clearly. This means investing in quality microphones and speakers. Noise-canceling microphones are a must, especially in open-plan offices. Consider a system that allows for both tabletop and ceiling-mounted microphones for maximum flexibility. Don’t forget acoustic treatment within the pod to minimize echoes and reverberation. A well-designed audio setup will make video meeting pods a breeze.
Securing Reliable Connectivity
Reliable connectivity is non-negotiable. Without a stable internet connection, your conference pod is essentially useless. Make sure your pod has both wired and wireless internet access. Consider installing multiple access points to ensure strong Wi-Fi coverage throughout the pod. Also, provide plenty of power outlets and USB charging ports. People need to be able to plug in their laptops, phones, and other devices without having to hunt for an outlet. Think about cable management solutions to keep things tidy and prevent tripping hazards. A dedicated internet connection is a must.
Don’t skimp on the tech. Investing in quality displays, audio systems, and connectivity will pay off in the long run by improving productivity and reducing frustration. Think of it as an investment in your team’s success.
Optimizing Lighting And Ventilation In Pods
Let’s talk about making those conference pods comfortable! It’s not just about sticking some chairs in a box. Good lighting and fresh air are super important for keeping people happy and productive. Nobody wants to feel like they’re stuck in a stuffy cave all day.
Incorporating Natural And Artificial Light
Okay, so natural light is the holy grail, right? If you can position your pods near windows, that’s awesome. But let’s be real, that’s not always possible. So, you gotta get smart with artificial light. Think about layering different types of light. Ambient light to fill the space, task lighting for focused work, and maybe some accent lighting to make it look nice. Don’t just rely on one overhead light – that’s a recipe for headaches.
Installing Adjustable LED Fixtures
Adjustable LED fixtures are a game-changer. Being able to dim the lights or change the color temperature can really help people feel more comfortable. Some people like bright, cool light for concentrating, while others prefer warm, soft light. Giving them the option to customize it is key. Plus, LEDs are energy-efficient, so you’ll save money on your electricity bill. It’s a win-win!
Ensuring Proper Air Circulation
Stuffy air is a productivity killer. Seriously, nobody can think straight when they’re breathing stale air. Make sure your pods have a good ventilation system. This could be as simple as vents connected to the building’s HVAC system, or you could install individual air purifiers with fans. The goal is to keep the air moving and prevent that closed-in feeling. When considering privacy pods for trade shows, ventilation is just as important as soundproofing.
Think about it this way: you wouldn’t want to spend hours in a room with no windows and no fresh air, right? Your employees feel the same way. Investing in good lighting and ventilation is an investment in their well-being and their ability to do their best work. Maybe even add some office phone booths for those private calls.
Customizing Interior Design For Seamless Collaboration
Interior design plays a huge role in how well your conference room pods actually work. It’s not just about making them look nice (though that’s important too!). It’s about creating a space that encourages people to connect, share ideas, and get things done. Think about it: a well-designed pod can be a real game-changer for team productivity.
Selecting Ergonomic Furniture
Comfort is key when it comes to furniture. If people are uncomfortable, they’re not going to be focused on the task at hand. Invest in ergonomic chairs that offer good support, and adjustable tables so people can find the right height for them. Consider offering a mix of seating options, like stools or even beanbag chairs, to cater to different preferences.
- Ergonomic chairs with adjustable lumbar support
- Adjustable-height desks to accommodate standing or sitting
- Variety of seating options (stools, couches, etc.)
Adding Branding Elements
Don’t forget to incorporate your company’s branding into the pod’s design. This helps to reinforce your company culture and create a sense of belonging. It could be as simple as using your company colors in the decor, or adding your logo to the walls. You could even create custom artwork that reflects your company’s values.
- Incorporate company colors into the pod’s design.
- Display your company logo prominently.
- Add artwork that reflects your company’s values.
Incorporating Biophilic Touches
Bringing nature into the workspace can have a positive impact on people’s well-being and productivity. Add some plants to the pod, or use natural materials like wood and stone in the decor. Even something as simple as a nature-themed screensaver can make a difference.
Studies have shown that exposure to nature can reduce stress, improve focus, and boost creativity. By incorporating biophilic design elements into your conference room pods, you can create a more inviting and productive environment for your team.
Implementing Booking And Access Control Systems
Okay, so you’ve got your conference pods all set up. Now, how do you make sure people can actually use them without chaos? That’s where booking and access control come in. It’s not just about preventing double-bookings; it’s about making the whole process smooth and efficient. Think of it as the bouncer for your meeting spaces – but a friendly, digital one.
Choosing Scheduling Software
Picking the right scheduling software is key. You want something that’s easy for everyone to use, integrates with your existing calendar system (Outlook, Google Calendar, etc.), and offers the features you need. Don’t just grab the first free thing you see. Consider these points:
- Integration: Does it play nice with your current systems? If it doesn’t, you’re just creating more headaches.
- User Interface: Is it intuitive? If people can’t figure it out, they won’t use it.
- Features: Does it offer room booking, resource allocation (like projectors or whiteboards), and reporting?
Some software even lets you set up rules, like limiting booking times or requiring approval for certain types of meetings. It’s worth spending a little extra time to find something that fits your specific needs. You might even want to look into software that allows for desk management too, if you have open work areas.
Integrating Badge Or App-Based Entry
Once someone books a pod, how do they get in? Keypads are okay, but they can be a pain to manage. A better solution is to integrate badge or app-based entry. This way, the system automatically grants access to the pod for the duration of the booking. Here’s why it’s a good idea:
- Security: You know who’s in the pod and when.
- Convenience: No more fumbling with keys or codes.
- Automation: It all happens automatically, saving you time and effort.
Implementing badge or app-based entry can significantly improve security and streamline the user experience. It also provides valuable data on pod usage, which can inform future decisions about space allocation and resource management.
Monitoring Utilization Metrics
You can’t improve what you don’t measure. Tracking how often your conference pods are used, and by whom, gives you insights into their effectiveness. Are some pods always booked while others sit empty? Are certain departments hogging all the space? This data can help you optimize your pod setup and make better decisions about future investments. Here are some metrics to keep an eye on:
| Metric | Description |
|---|---|
| Booking Frequency | How often each pod is booked. |
| Average Booking Duration | How long people typically use the pods for. |
| Peak Usage Times | When the pods are most in demand. |
| User Demographics | Which departments or teams are using the pods. |
| No-Show Rate | How often people book a pod but don’t actually use it. |
By analyzing these metrics, you can identify areas for improvement and ensure that your conference pods are being used effectively. Maybe you need more small acoustic pods or maybe you need to adjust booking policies. The data will tell you.
Maintaining And Scaling Conference Room Pods
Establishing Cleaning Protocols
Okay, so you’ve got these awesome conference pods set up. Now, how do you keep them from turning into biohazards? It’s all about setting up a solid cleaning routine. Think about it: lots of people using the same space, touching the same surfaces…germ city! A regular cleaning schedule is a must.
Here’s what I’d suggest:
- Daily Wipe-Downs: Get those high-touch areas like tables, door handles, and tech interfaces cleaned every day. Use disinfectant wipes – they’re quick and easy.
- Weekly Deep Clean: Once a week, give the whole pod a proper scrub. Vacuum the floors, clean the glass, and really get into the corners.
- Monthly Check-Up: Do a more thorough inspection once a month. Check for any wear and tear, replace air filters, and make sure all the equipment is working properly.
It’s a good idea to post the cleaning schedule somewhere visible so everyone knows what to expect. Also, provide cleaning supplies within the pod so users can quickly wipe down surfaces after use. This helps maintain cleanliness between scheduled cleanings.
Performing Regular Technical Audits
Tech gremlins. They’re always lurking, waiting to strike at the worst possible moment. To keep your conference pods running smoothly, you need to do regular tech audits. This means checking all the equipment to make sure it’s working as it should. Think of it as a health check for your tech.
What to include in your audit:
- Audio-Visual Equipment: Test the displays, microphones, and speakers. Make sure the sound is clear and the picture is sharp. Check all the cables and connections.
- Connectivity: Verify that the internet connections are stable and fast. Run speed tests and check for any network issues. Make sure the Wi-Fi is working properly.
- Software and Updates: Ensure all software is up to date. This includes operating systems, video conferencing apps, and any other relevant programs. Outdated software can cause glitches and security vulnerabilities.
Planning For Future Expansion
So, your conference pods are a hit! Everyone loves them, and now you need more. That’s a good problem to have, but it requires some planning. You can’t just slap a new pod down anywhere; you need to think about how it fits into the overall office layout and how it will impact existing resources. Think strategically about where and how you’ll add more pods.
Here are some things to consider:
- Space Availability: Do you have enough physical space to add more pods? Consider both the footprint of the pod itself and the surrounding area. You don’t want to create bottlenecks or cramped spaces.
- Infrastructure: Can your existing infrastructure support more pods? This includes things like power, network connectivity, and ventilation. You may need to upgrade these systems to accommodate the additional load.
- Budget: How much money do you have to spend on expansion? Conference pods can be a cost-effective alternative to traditional conference rooms, but they still require an investment. Factor in the cost of the pods themselves, as well as any necessary infrastructure upgrades.
| Factor | Consideration
## Conclusion
Putting together a conference pod doesn’t have to be a big headache. Think about layout, sound dampening, lighting, and a solid internet hook-up. Get a decent mic and screen so voices and faces stay clear. Toss in some extra outlets and maybe wheels if you need to move things around later. Before you know it, you’ve carved out a quiet nook where ideas can flow—no barking dog or hallway chatter to ruin the vibe. It might feel odd at first, but soon enough everyone will wonder how they ever ran calls without it. Give your pod a test run, tweak a few things, and watch meetings go from chaotic to easy.
Frequently Asked Questions
What is a conference room pod and why should I use one?
A conference room pod is a small, enclosed space inside a larger room or office. It gives people a quiet spot for video calls, team chats, or focused work without distractions.
How do I choose the right spot for a pod?
First, measure the area to be sure the pod fits. Think about where people walk so you don’t block paths. Also pick a spot near power outlets and good Wi-Fi.
What materials help keep a pod soundproof?
Sound-absorbing foam panels on walls and ceilings work well. Thick fabric or carpet on floors helps too. A solid door seal stops noise from leaking in or out.
What tech should I install in a conference pod?
Include a clear, high-resolution screen, a good webcam, and a microphone and speaker system. Add enough power outlets, USB ports, and reliable Wi-Fi so calls never drop.
How can people book and unlock a pod?
Use simple scheduling software so users can see available times and book online. For entry, add a badge card reader or a mobile app code to lock and unlock the door.
What is the best way to keep pods clean and ready to use?
Wipe down surfaces every day and clean glass or screens weekly. Check tech gear, cables, and lights each week. Fix any broken parts right away and plan for more pods if your team grows.